Recently, during the month of October, word of a new "Red Fuji" print was released by Paul Binnie to a worldwide audience of both woodblock print dealers and collectors via a series of email announcements. To print collectors who were already knowledgeable of Binnie's considerable talents as a printmaker, this was certainly welcome news, which was met with enthusiasm and anticipation. Not only was Binnie already well recognized worldwide as a considerable artistic talent, but on top of that, he alone was also both the carver AND then printer of all his own works. Several previous accolades had been written praising both the artistic and technical merits of Binnie's works, most notably, John Fiorillo's web pages on "Paul Binnie" where previous examples of his works had been highlighted.
To those readers not yet familiar with this considerable artistic talent, it should be explained that his actual woodblock carving and printing skills were learned during a 6-year period of time (1993 to 1998) where much was learned under the supervision of Kenji Seki, who was Doi Publisher's highly respected and skilled printer of over a 30-year period. Paul had this to say about learning these skills and time spent with Seki: "although I was partly self-taught in carving, he (Seki) is also a very skilled carver as well as an expert printer, so he helped me with both aspects." He then had this to add: "I also had contact with Ralph Kiggell, a very good friend of mine now, who was then at the Yoshida Hanga Academy, and it was through him that I went to Yoshida's Studio and met Toshi Yoshida, and had numerous occasions to sit-in on the work of the Studio."
Clearly then, during Binnie's years while he resided in Japan, he surrounded himself with and exposed himself to the talents of some of the finest carvers and printers of the day. To state that he was an attentive student and a quick study of the art of Japanese printmaking is indeed an understatement.
Many of the artworks produced by Binnie are truly extraordinary--so much so that German collector (and dealer) Dieter Wanczura has had this to say about Binnie: "In my personal view he has an extraordinary talent - a combination of artistic expression and technical mastership. I keep a personal collection of his prints and I would not be astonished if Paul became one of the great names among the artists of the 21st century."
And, here at Ukiyoe-Gallery, we whole-heartedly agree....
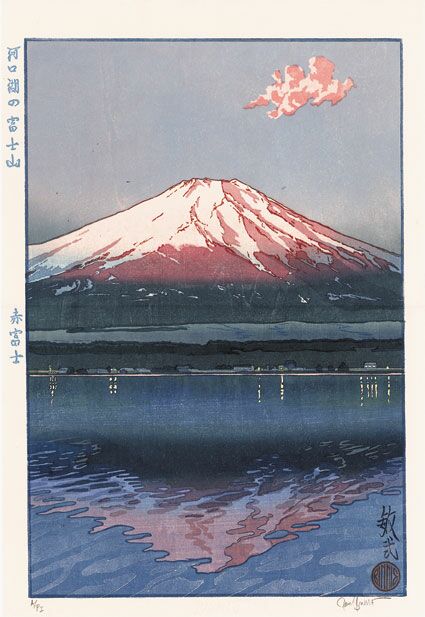
"Aki Fuji" Described in Paul Binnie's Own Words....
"I am delighted that my new woodblock print, 'Aka Fuji' or 'Red Fuji', is nearing
completion, and will be released during November 2002. This print, whose title is
'Kawaguchiko no Fujisan. Aka Fuji', is very much in the shin-hanga style of the
landscape artists of the inter-war years, such as Yoshida and Hasui, whose work
I admire enormously. I have taken inspiration from the ca.1830-32 Hokusai print,
'South Wind, Clear Dawn', (popularly known as Aka Fuji), one of his famous '36
Views of Mount Fuji', but have interpreted the idea in a purely contemporary,
realist way, rather like my earlier landscape woodblocks. However this print is
much more technically demanding than most of my previous landscapes, and uses
twenty-two colours, as well as mica and embossing (blind-printing or gauffrage)
to create a sense of the atmosphere of the first rays of the morning sun striking
the mountain-side."
"The edition will be of 100 examples, as is usual with my dai-oban-size woodblocks
(42 x 29 cm, 16 1/2 x 11 1/2 inches), and is printed on 100% mulberry washi from
Iwate Prefecture in Japan."
We Started Discussions with Paul.....
Somewhat unfortunately, in the production of this article, we at Ukiyoe-Gallery were not aware that Paul's new work was well underway until we received word that the actual printing of 100 copies had at that time already started. That being the case, we were therefore unable to have images shot of Paul's actual carving process. However, we were so intrigued by what were hearing about the entire production process that we wanted to share some of what we were learning with our readers. Much of what follows, then, is simply a "Q & A"--with questions asked by us then answered by Binnie.
The Making of "Red Fuji" -- A "Q & A"
On November 9th, we learned from Paul that the actual printing of "Red Fuji" was already then well underway, when he told us that day "I'll let you know how I'm getting on as I print; I'm currently up to the 9th colour out of 22+..."
What follows then are a series of questions we posed to Paul in an exchange that lasted over the next several days:
U-G Q: "Paul, are we correct to then assume that with 22 colors, this means that only a single color can be printed per day times 22 days??"
Binnie A: "If only life were so simple! With 80-odd impressions (apparently an initial 20 were printed earlier) to pull at one time, almost all of which involve 'bokashi' which is very time consuming, I rarely manage to print all 80 sheets in one day. The exception being, unless it's a small, easy area, like the darker pink shadow of the cloud. Some of the colours are actually printed two to a block, shaded into each other, the most obvious example being the 'ruddy-pink mountain side' just below the snow-line shading into 'blue-green shadow' below. In that case, I'm obviously able to work with two inks at the same time, since they have to be mixed on the block..."
U-G Q: "When and how is the 'mica' applied?? Is it sprinkled OVER a wet, just-printed area? Or is it ADDED TO the pigment and part of same application?"
Binnie A: " 'Mica' is printed from a block like every other colour, which is how it can be shaded in 'bokashi' as I have done on this print. If I (instead) sprinkled it, it would look like 'glitter' on a cheap Christmas card!! Sprinkled 'mica' tends to come off more easily, too, so isn't so desirable in fine-quality prints. Pure 'mica power' is suspended in a solution of gum arabic and distilled water to make a thin paste, which is mixed on the block with rice paste and it is then printed onto the paper. There is no pigment in this case, and I tend to find that if I need colour, it's best to print the colour first and then lay (over-print) the 'mica' on top, like the background of my print of 'Nakamura Utaemon as Agamaki,' where the 'bokashi pink' and the 'mica' are printed from the same block in different stages."
Paul then added: "There's so much more (to tell you), that I'll have to postpone answering all the points until I have a break in my printing work. You will be pleased to learn, however, that I have asked a friend who has a digital camera to take some photos for you tomorrow."
U-G: "Thanks Paul, photos will be very much appreciated. We really think that our readers will be equally amazed when they learn just how involved, technical, and how much 'just plain hard work' goes into the printing of EACH individual sheet."
U-G Q: "OK then Paul, a few more simple questions..... First, how is the "bokashi' application actually accomplished?? Brushes, rags, cotton swabs....? How exactly is it applied to the blocks and how is the 'gradation' of color achieved?"
Binnie A: "To do the 'bokashi' (shading), I use a wet brush to 'shade off' an inked block, although some other printers use rags. I find a brush more controllable, and it gives a smoother 'bokashi.' The ink is first applied with one brush and then another wet brush is used to 'lift' some of the ink off of the area one wants to be paler."
U-G Q: "Tell us about the 'keyblock' used to print this 'Aki Fuji' print. With the 'thin/narrow raised edges' of this key-block, is there anything different or special about printing off of this first block??"
Binnie A: "Actually, there is nothing special about printing off the 'keyblock' except that one has to be extremely careful about absolutely correctly 'registering' the paper against the 'kento'--because if not done accurately, all the subsequent colours will mis-register."
U-G Q: "Sure, that makes sense. OK then--with 22 colors overall, is there a 'logical order' as to how the colors are printed or overlaid?? Dark's first? Light's first? Large or small areas first? Or, does it matter? How do you decide?"
Binnie A: "For printing order, generally I print the lightest colors first and the darkest colors last. But if you intend to 'over-print' one colour onto another, you first need to dry out the paper completely, then re-dampen it to avoid the first wet area 'rejecting' the second colour application - which is what I'm doing right now! Finally then 'mica' and 'embossing,' in that order, are the last stages."
U-G Q: "In total then, how many actual individually carved blocks were then required to produce the 22 over-laid colors that we see in the final 'Red Fuji' print? Of course, it seems that the use of a few '2-color blocks' might mean a somewhat less than 22 in total? And finally, are these blocks also carved on both sides?"
Binnie A: "To produce 'Red Fuji' required the use of 7 separate blocks--however all were carved BOTH sides, so the result was a total of 14 individual 'block faces'. This is a bit less than the 22 that you would expect, but remember that several of these 14 'block faces' are carved to accommodate the simultaneous printing of more than one color."
U-G: "Thanks Paul--You've been most helpful in helping us to better understand 'just exactly how' some of this printing process is accomplished. we know that personally we're really find the 'printing process' to be quite fascinating, and we're therefore sure that our readers will appreciate learning about these details that you've shared with us."
Paul: "Well, you're both welcome. I've actually enjoyed spending some time away from all this recent printing--it's been fun sharing this technical stuff with you. Really--if you have any further questions, please just let me know....."
And so, we concluded our questioning of Paul, next turning with interest to the several "in process" printing photos that he'd passed our way. Just below, you will find several images taken in Paul's own studio/printshop--the descriptive captions are in Paul's own words.
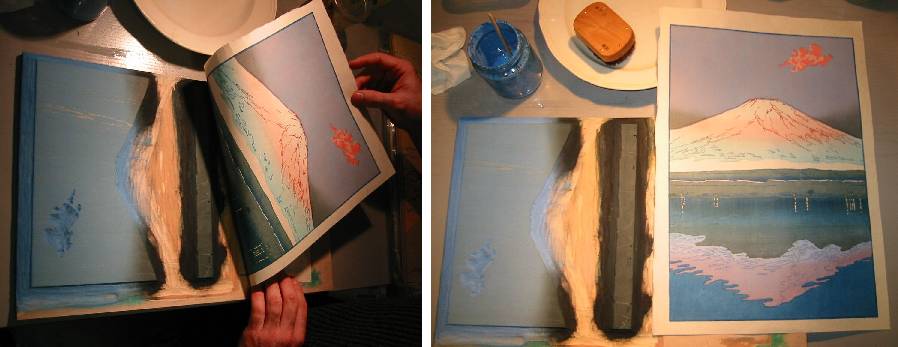
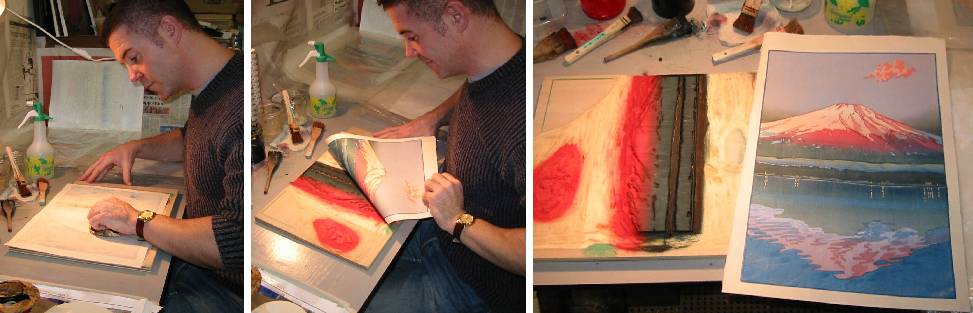
A Few Photos of the Printing Process....
Sky area printing (blue and gray 'bokashi'): Lifting the print.... The finished result.
Red mountainside printing (red 'bokashi'): Rubbing with "baren".... Lifting the print.... The finished result.
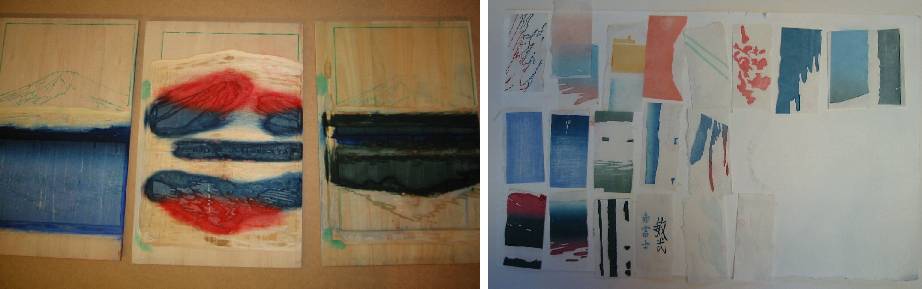
A selection of three blocks.......... Sample pieces of paper showing tones and shading.
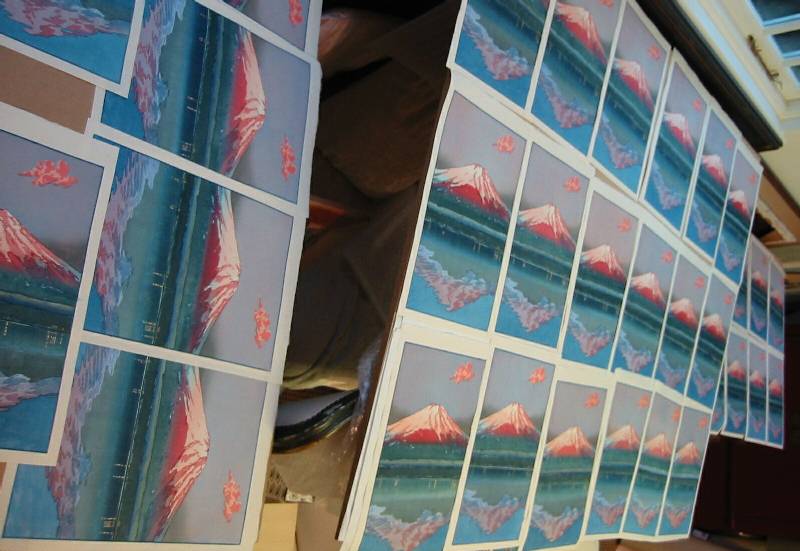
Dozens of "Fuji's" laid out to dry between printings.
Again..... the finished result.
Overall Project Perspective
For overall perspective as to the entire project, Paul gave us these further details as to "Red Fuji's" production time-line:
"Overall, it has taken approximately three months to produce this print, as my start
date was the 12th of August, design and so on were very fast, cutting less so, and
printing very slow! About two to three days designing, three weeks to one month
cutting, over two months printing.
Initially, I printed the first 25 or so copies, in order to have an image that I could
pre-release. Then, I'm now completing the final 80 copies, which finishes the edition
and (in total) gives me a few prints left over for 'artist's proofs' copies."
We also learned that Binnie's actual design for this "Red Fuji" print comes from Paul's earlier trip made to Lake Kawaguchi, where he had spent time there sketching during his extended residency in Japan. Describing the design process, he said "I pretty much go straight into the design from a very rough sketch, 'understandable' only to me I guess, with the actual 'Red Fuji' design coming to me from that memorable sketching trip made back in the summer of 1997."
What the Future May Hold....
As an interesting aside to what we were learning earlier about Binnie's "Red Fuji" and the excitement that was surrounding its release, we learned (or perhaps we should more accurately say, we "heard") that this new "Red Fuji" was to be only the FIRST print of a very ambitious ONE HUNDRED PRINT SERIES titled "100 Views of Famous Places in Japan."
Oddly, when WE then contacted Paul to learn more about this very ambitious and exciting project, we then learned from Paul good-naturedly in his own words: "I have one slight reservation, which is only (perhaps) me being fussy....and that is I that don't remember (ever) saying there would be 100 prints in the series!!! Oh well--Hokusai was forever announcing series which he never got actually produced, so at least I have a precedent... And who's to say the eventual series won't number 100 designs in the end?"
And so, as with our earlier interviews with Paul, we found him again to be both cheerful and "accommodating." Perhaps so--given his young age, his good health, and now perhaps this "incentive" we've provided--we may indeed eventually see an output of "Famous Views" that will in the end total 100.
Judging from what we've seen of this FIRST print (and hints of a second "famous view" already underway), we certainly hope so.
If you wish to purchase...
A good representation of many of Paul Binnie's most popular prints are located in our Gallery #4, where you can view and learn the details about each. Other prints by Paul Binnie may be available by request.
And, Stay Tuned...
We at Ukiyoe-Gallery will continue to work closely with Paul as he develops his next "100 Views" print, and will help announce further word of his next remarkable release as details become available. We're further hoping at that time to catch and publicly record it's entire production cycle--beginning from design, to then carving, and finally the printing.
(c) Thomas Crossland and Andreas Grund, November 2002